Locations in QuickBooks Online
Estimated reading time: 9 minutes
Locations in QuickBooks Online are an advanced categorization feature that can be used to track activity for offices, regions, departments, property locations, and more. Locations are not a feature in desktop editions of QuickBooks.
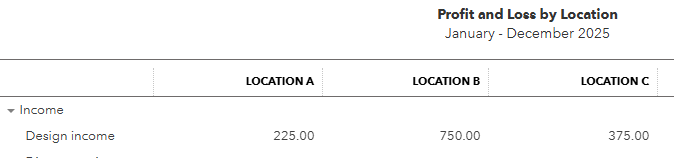
Reports can be run by location for sales and expenses, accounts receivable, accounts payable, and other balance sheet accounts.
Locations are only available in QuickBooks Online Plus and QuickBooks Online Advanced.
Setting up locations in QuickBooks Online is a simple, two-step process.
Two Step Set-Up Process
- First, you need to enable location tracking in QuickBooks settings.
- Next, you need to set up the actual locations that are specific to your company. Create locations that you would like to see as separate columns on your financial reports. This list will be used when you enter transactions such as checks and invoices.
Step 1: Enable Locations in QuickBooks Online
In order to enable location tracking in QuickBooks, you will first need to head over to the gear icon (settings).
How to Enable Locations in QuickBooks Online
- Click the Gear Icon at the upper right

- Select Account and Settings

- Then select Advanced
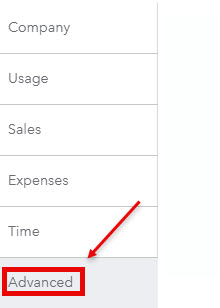
- Find the Categories section on the right. Select the pencil icon on the far right to edit.

- Click the button to turn on locations

- Decide on a label name for your locations.
QuickBooks Online gives you several different options, including business, department, division, location, property, store, and territory.

- Finally, select Save.

Next, you will need to set up your location list.
Step 2: Setup Your Location List
Next, you will need to enter the locations that are specific to your company or firm. These are the locations that you will use when entering transactions. Reports will also be created using your locations.
You may use whatever location names are best for your company.
Some examples might be:
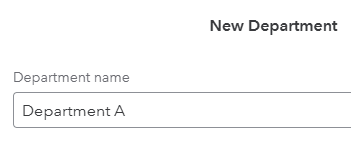
- Department A
- Department B
- Department C
- Eastern Territory
- Western Territory
- Northern Territory
- Main Street Property
- Elm Street Apartment
- East Street Office Building
Entering your locations is easy in QuickBooks Online.
There are two ways to enter new locations.
Method 1: Create locations while entering a transaction
One way is to add a new location while you are entering a transaction.
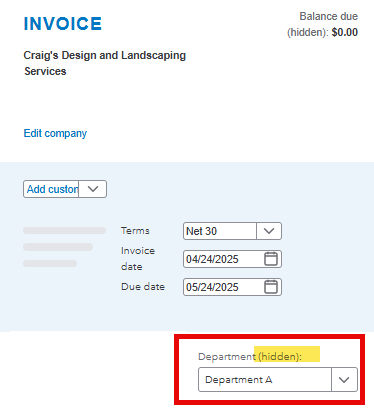
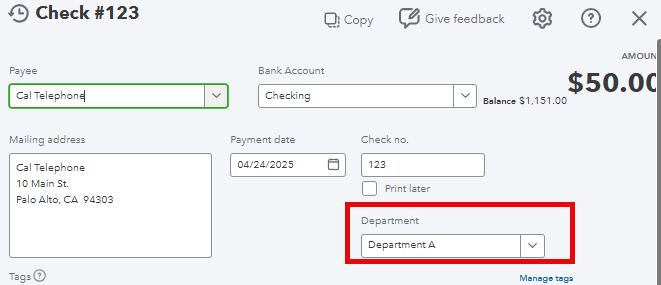
Open a transaction form such as an invoice or check, and you will now see a field to enter the department.
Click in the department field (that was added in step 1), and you will see an option to “Add new.” Below is an example of a check with a field to add departments. Click the down arrow, and you will see + Add new.

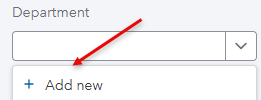
This allows you to enter a new location (department).
Another method is to use the Locations List.
Method 2: Create Locations using the Locations List
There is a better way to add locations that will give you more options.
First, open the gear icon (settings) at the upper right.
Under “Lists,” select “All Lists.”
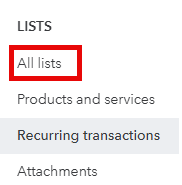
Then select “Locations” or other label name you have selected (such as Departments).
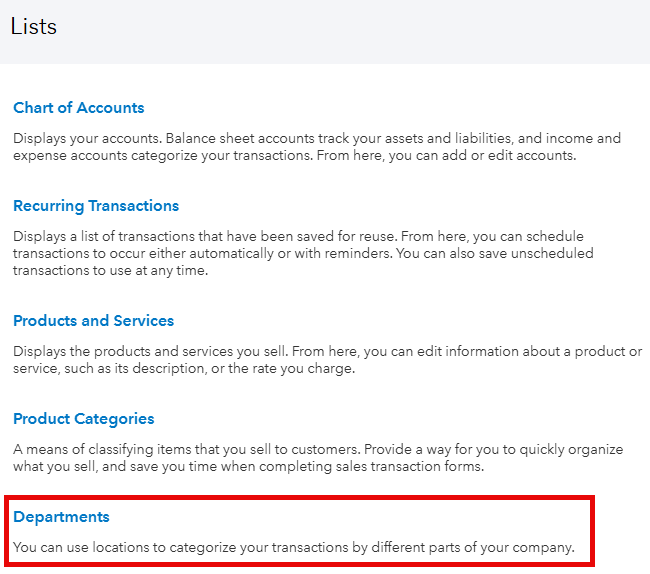
Select “New” at the top right.

Selecting “New” will give you several customization options, and a pop-up window will appear.
What are all the checkboxes used for? Let me give you some examples.
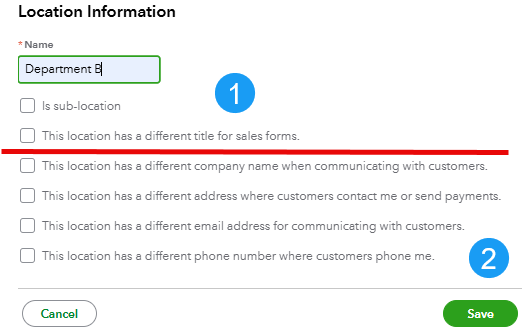
Customizing Locations
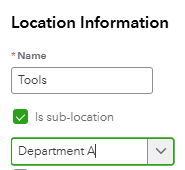
The first section allows you to create departments and sub-departments.
The second section allows you to add unique address/contact information for each location.
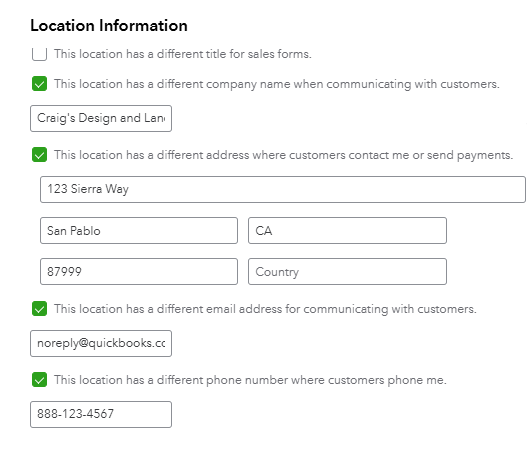
Please note that as a general rule, you should have a separate QuickBooks Online subscription for each entity with a tax ID number. If the sub-location has a separate tax ID number, please consult your CPA before using this feature. There are exceptions.
Edit and Inactivate Locations
Select the gear icon > Lists > Locations.
You will then see a small down arrow on the right. Click the arrow for the edit and make inactive options.

Transactions that use Locations in QuickBooks Online
Locations can be used on many transactions. These include:
- Invoices
- Estimates
- Credit Memos
- Sales Receipts
- Recurring Payments
- Refunds & Delayed Charges
- Expenses
- Checks
- Bills
- Purchase Orders
- Credit Card Credits
- Journal Entries
- Batch Transactions
How to Use Locations when Creating Transactions
When entering transactions such as invoices and checks, you will have the option to enter a department. This will not be seen by the customer.
Reports using Locations
Reports for locations include:
Customize Reports for Locations
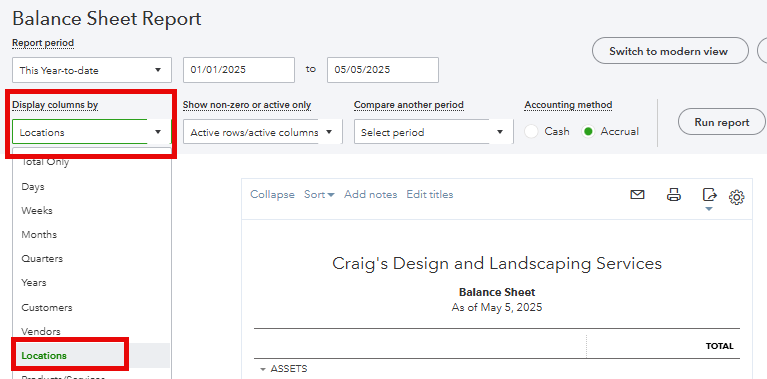
You can customize other reports, like balance sheet reports, to display the location.
Budgets by Location
When setting up a budget, selecting “subdivided” will allow you to enter a location.

FAQ’s
No. Projects are normally short-term, and QuickBooks has a great feature to account for projects. Locations are for more permanent elements of your business, such as office locations, rental properties, and divisions.
The entire check or invoice can only have one location. You can have a different class on each line of a check or invoice, but only 1 location.
Yes, locations have been added to the journal entry form.
Quick Summary
Locations are a great, flexible option for advanced categorization that is not available in desktop editions. It can be used in addition to classes to give you more flexibility. Only 1 location can be used per form (invoice, check, etc.). It can work well for a remote office that invoices and bills separately. A P&L can then be generated by office location, giving you greater reporting insights.
Support Links
Here are some QuickBooks support links.